The response to the COVID-19 pandemic means that social distancing has become the new normal. It also means that more Americans are using video conferencing to connect with colleagues working from home or friends and family in quarantine because of the new coronavirus.
In general, video conference calls on a computer are pretty bland compared to their counterparts on mobile apps, except for virtual backgrounds on Zoom. However, a lesser-known product from Snap, the parent company of Snapchat, gives you the ability to inject Snapchat's popular augmented reality Lenses into video conference calls on Zoom, Google Meet, Skype, and other popular desktop platforms.

The secret behind its magic trick is Snap Camera, and we'll show you how to use it to add some AR flair to your video conferences with the software.
Download & Install Snap Camera
Simply put, Snap Camera is the desktop version of Snapchat with the Chat and Discover sections stripped away, so only the camera remains. You get access to most of the augmented reality Lenses designed for the front-facing mobile camera, and it allows you to snap photos and record videos with AR effects from your webcam, such as the iSight, FaceTime, or FaceTime HD cameras in Macs.
To run Snap Camera, you'll need a PC running at least Windows 10 (64 bit) or a Mac running macOS 10.11 or above. In terms of hardware, you'll need at least an Intel Core i3 2.5 GHz or AMD II 2.6 GHz with 4 GB of RAM and an Intel HD Graphics 4000, Nvidia GeForce 710, or AMD Radeon HD 6450 as a graphics processor, as well as a screen resolution of 1280 x 768 pixels or more.
If your machine satisfies those requirements, navigate to the Snap Camera website to download the install package. When you click the download button, scroll down, and read through and accept the terms and conditions, which includes checking the acceptance box and reCAPTCHA box (the email is voluntary). After downloading the package, run the .exe or .pkg file and follow the on-screen installation instructions.

Shut Down Your Current Video Conferencing App
Before installing Snap Camera, close down any video conferencing apps that you plan to use. For web-based platforms like Google Meet, you'll need to quit Chrome or your default web browser.
Select Your Favorite AR Lens
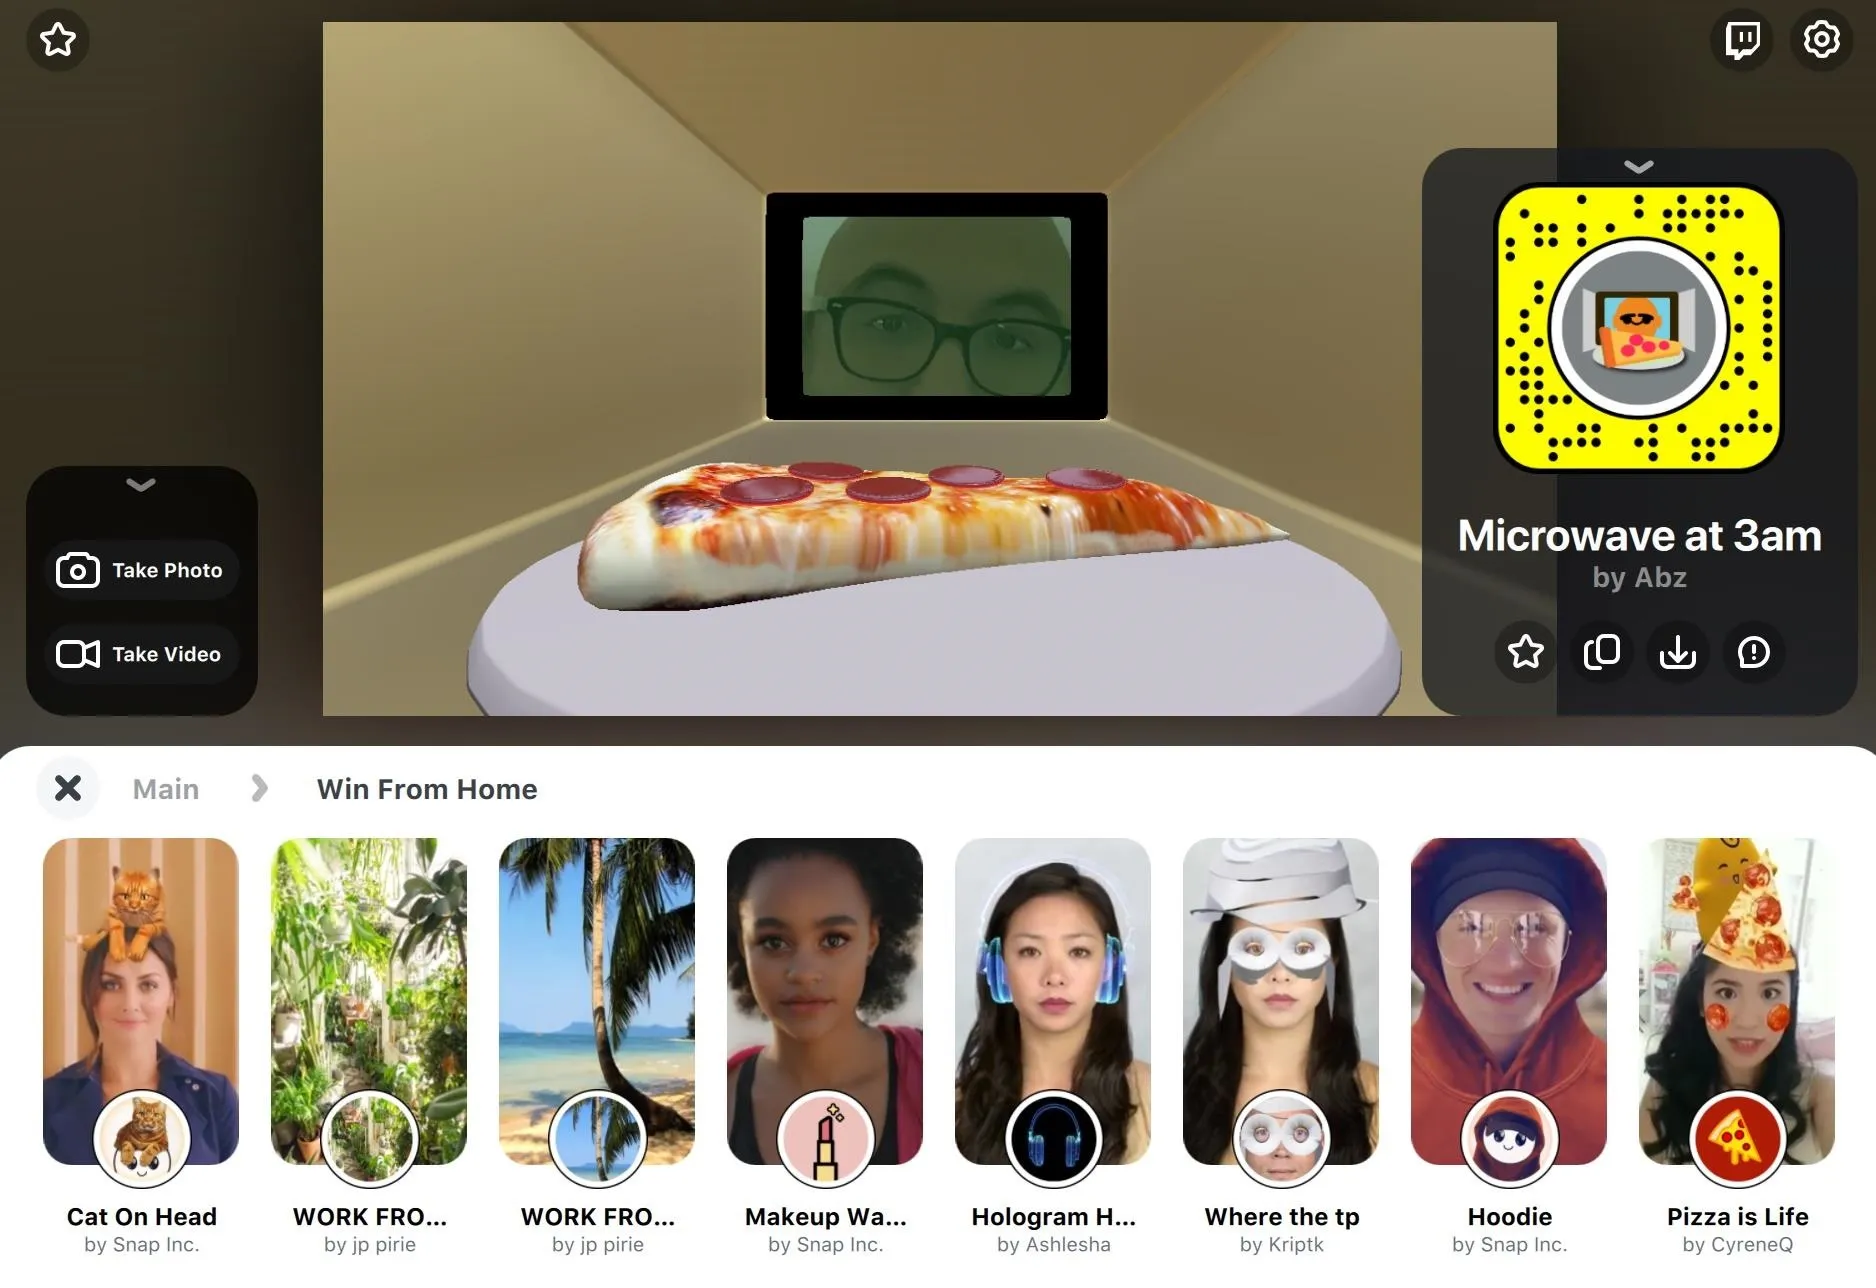
After opening the Snap Camera, you'll notice that its interface is relatively simple. At the top is the video preview, where you'll see your selected Lens on display in all its AR glory.
Below the selfie view is a grid of Lenses, including a row of featured Lenses, groups of curated selections, and a gallery the top creations from the Lens Studio community. If you're looking for a specific Lens, you can search for it by name or its creator in the search bar. You can also add Lenses to your list of favorites for quick access in the future or browse recent selections in your Lens History.
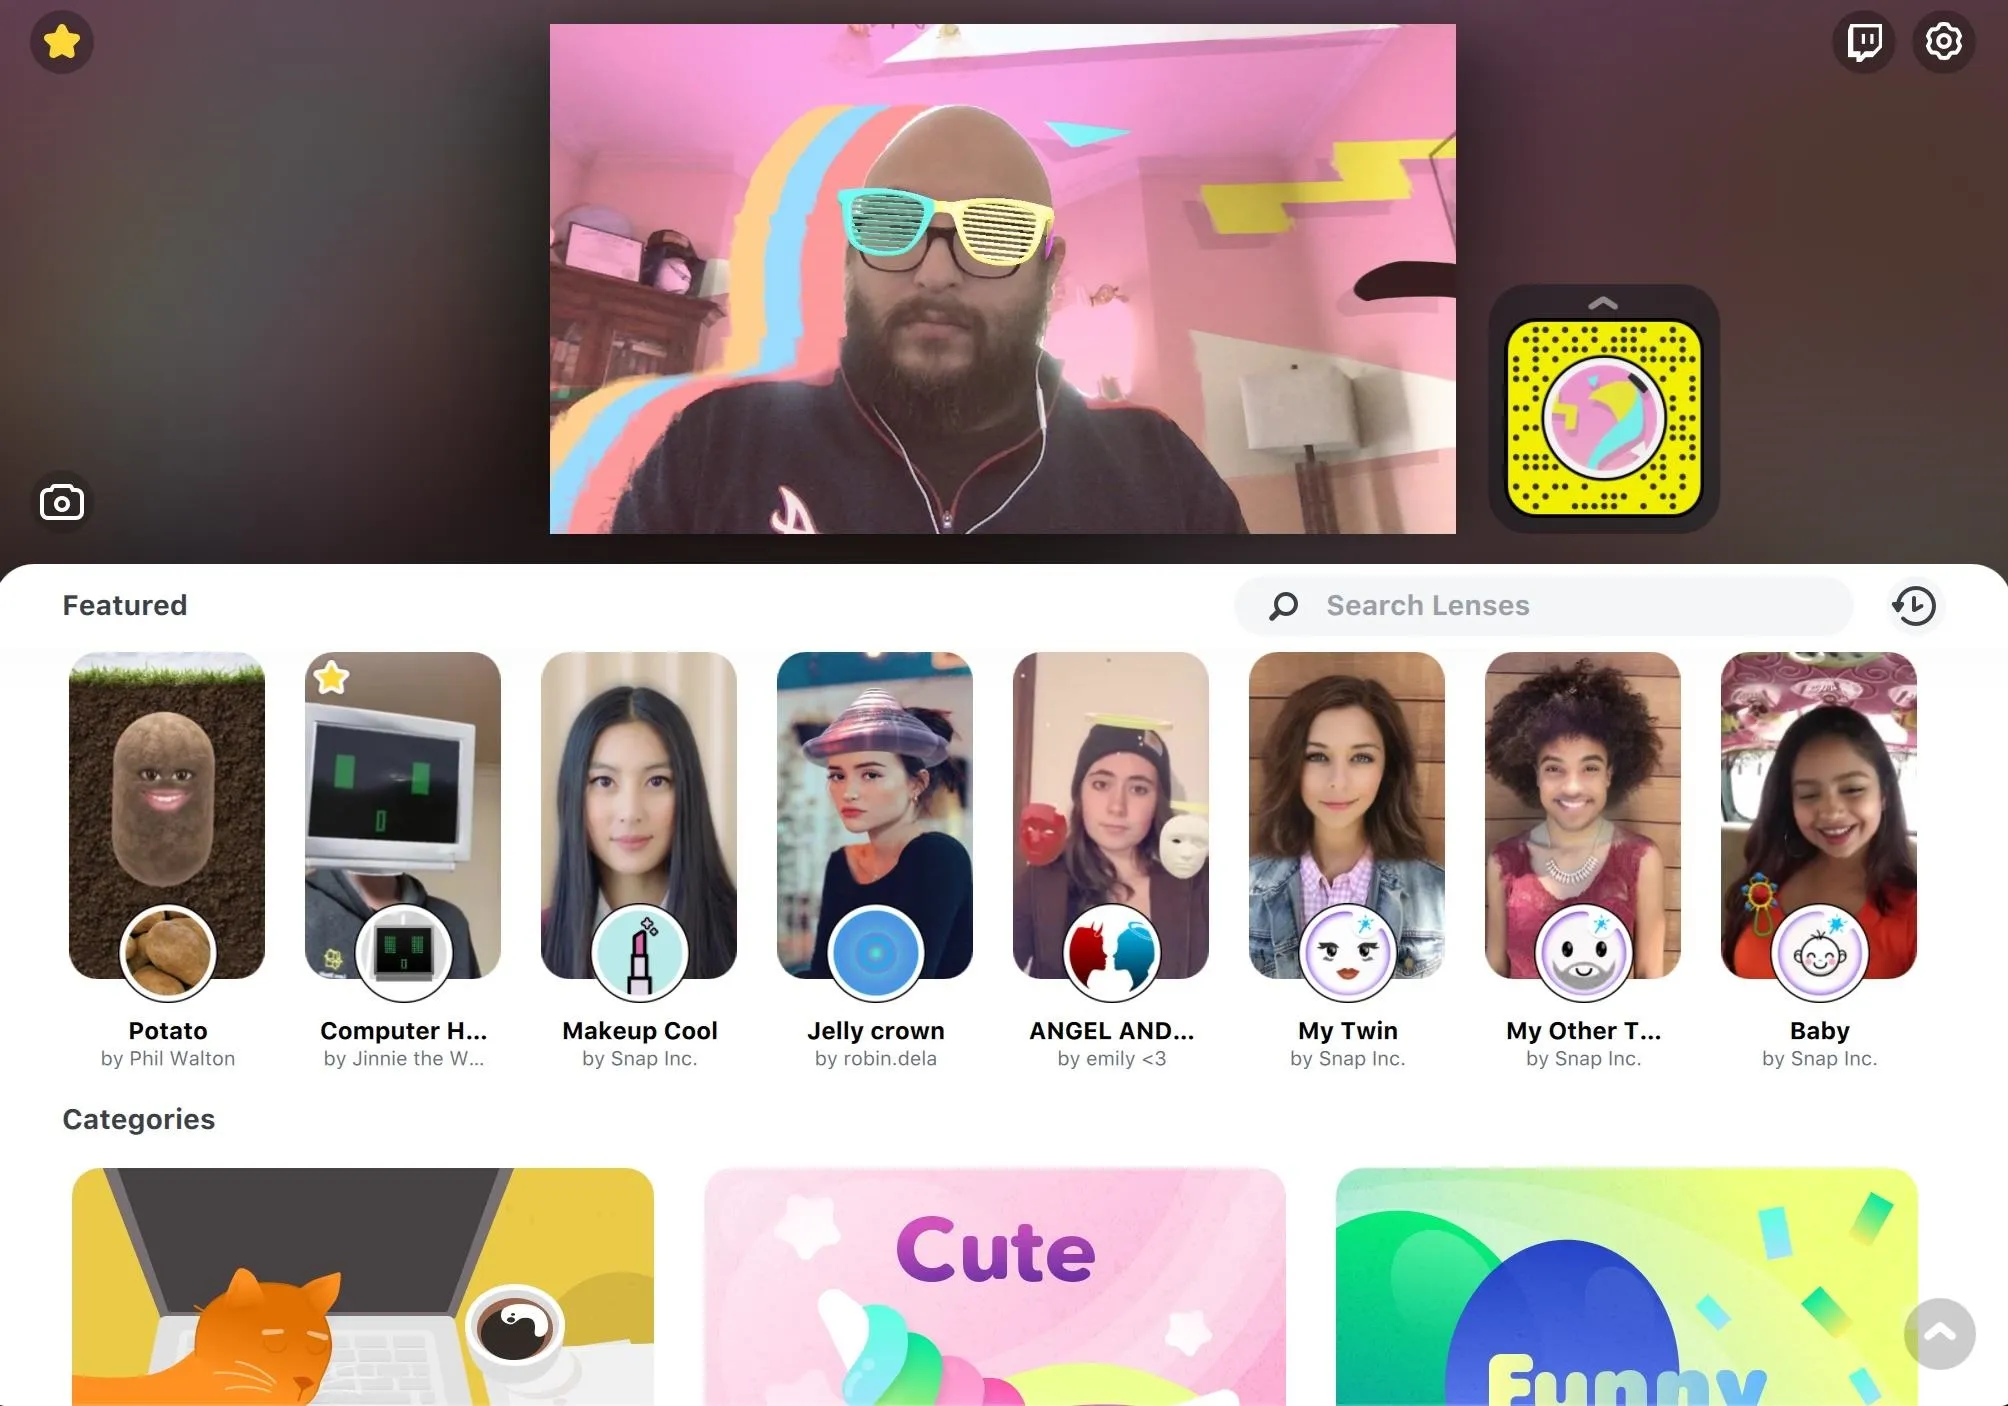
Just click on one of the Lenses to apply it in the camera view. With the Lens activated, you can click on the camera icon to the left to capture a photo or video.
There's one special skill that Snap Camera has over its mobile counterpart — it can act as a virtual webcam for your computer. It's what makes it possible to use those AR Lenses in other video apps.
Change Your Video Conferencing App's Camera
If you forgot to close down your video conferencing app or the web browser it runs in during Step 2, you'll need to restart it before proceeding.
To get AR Lenses from Snap Camera onto the video calling application of your choice, the short answer is to select Snap Camera as your webcam in settings, typically via a drop-down menu. However, the long answer is that it depends on the platform you are using.
Zoom
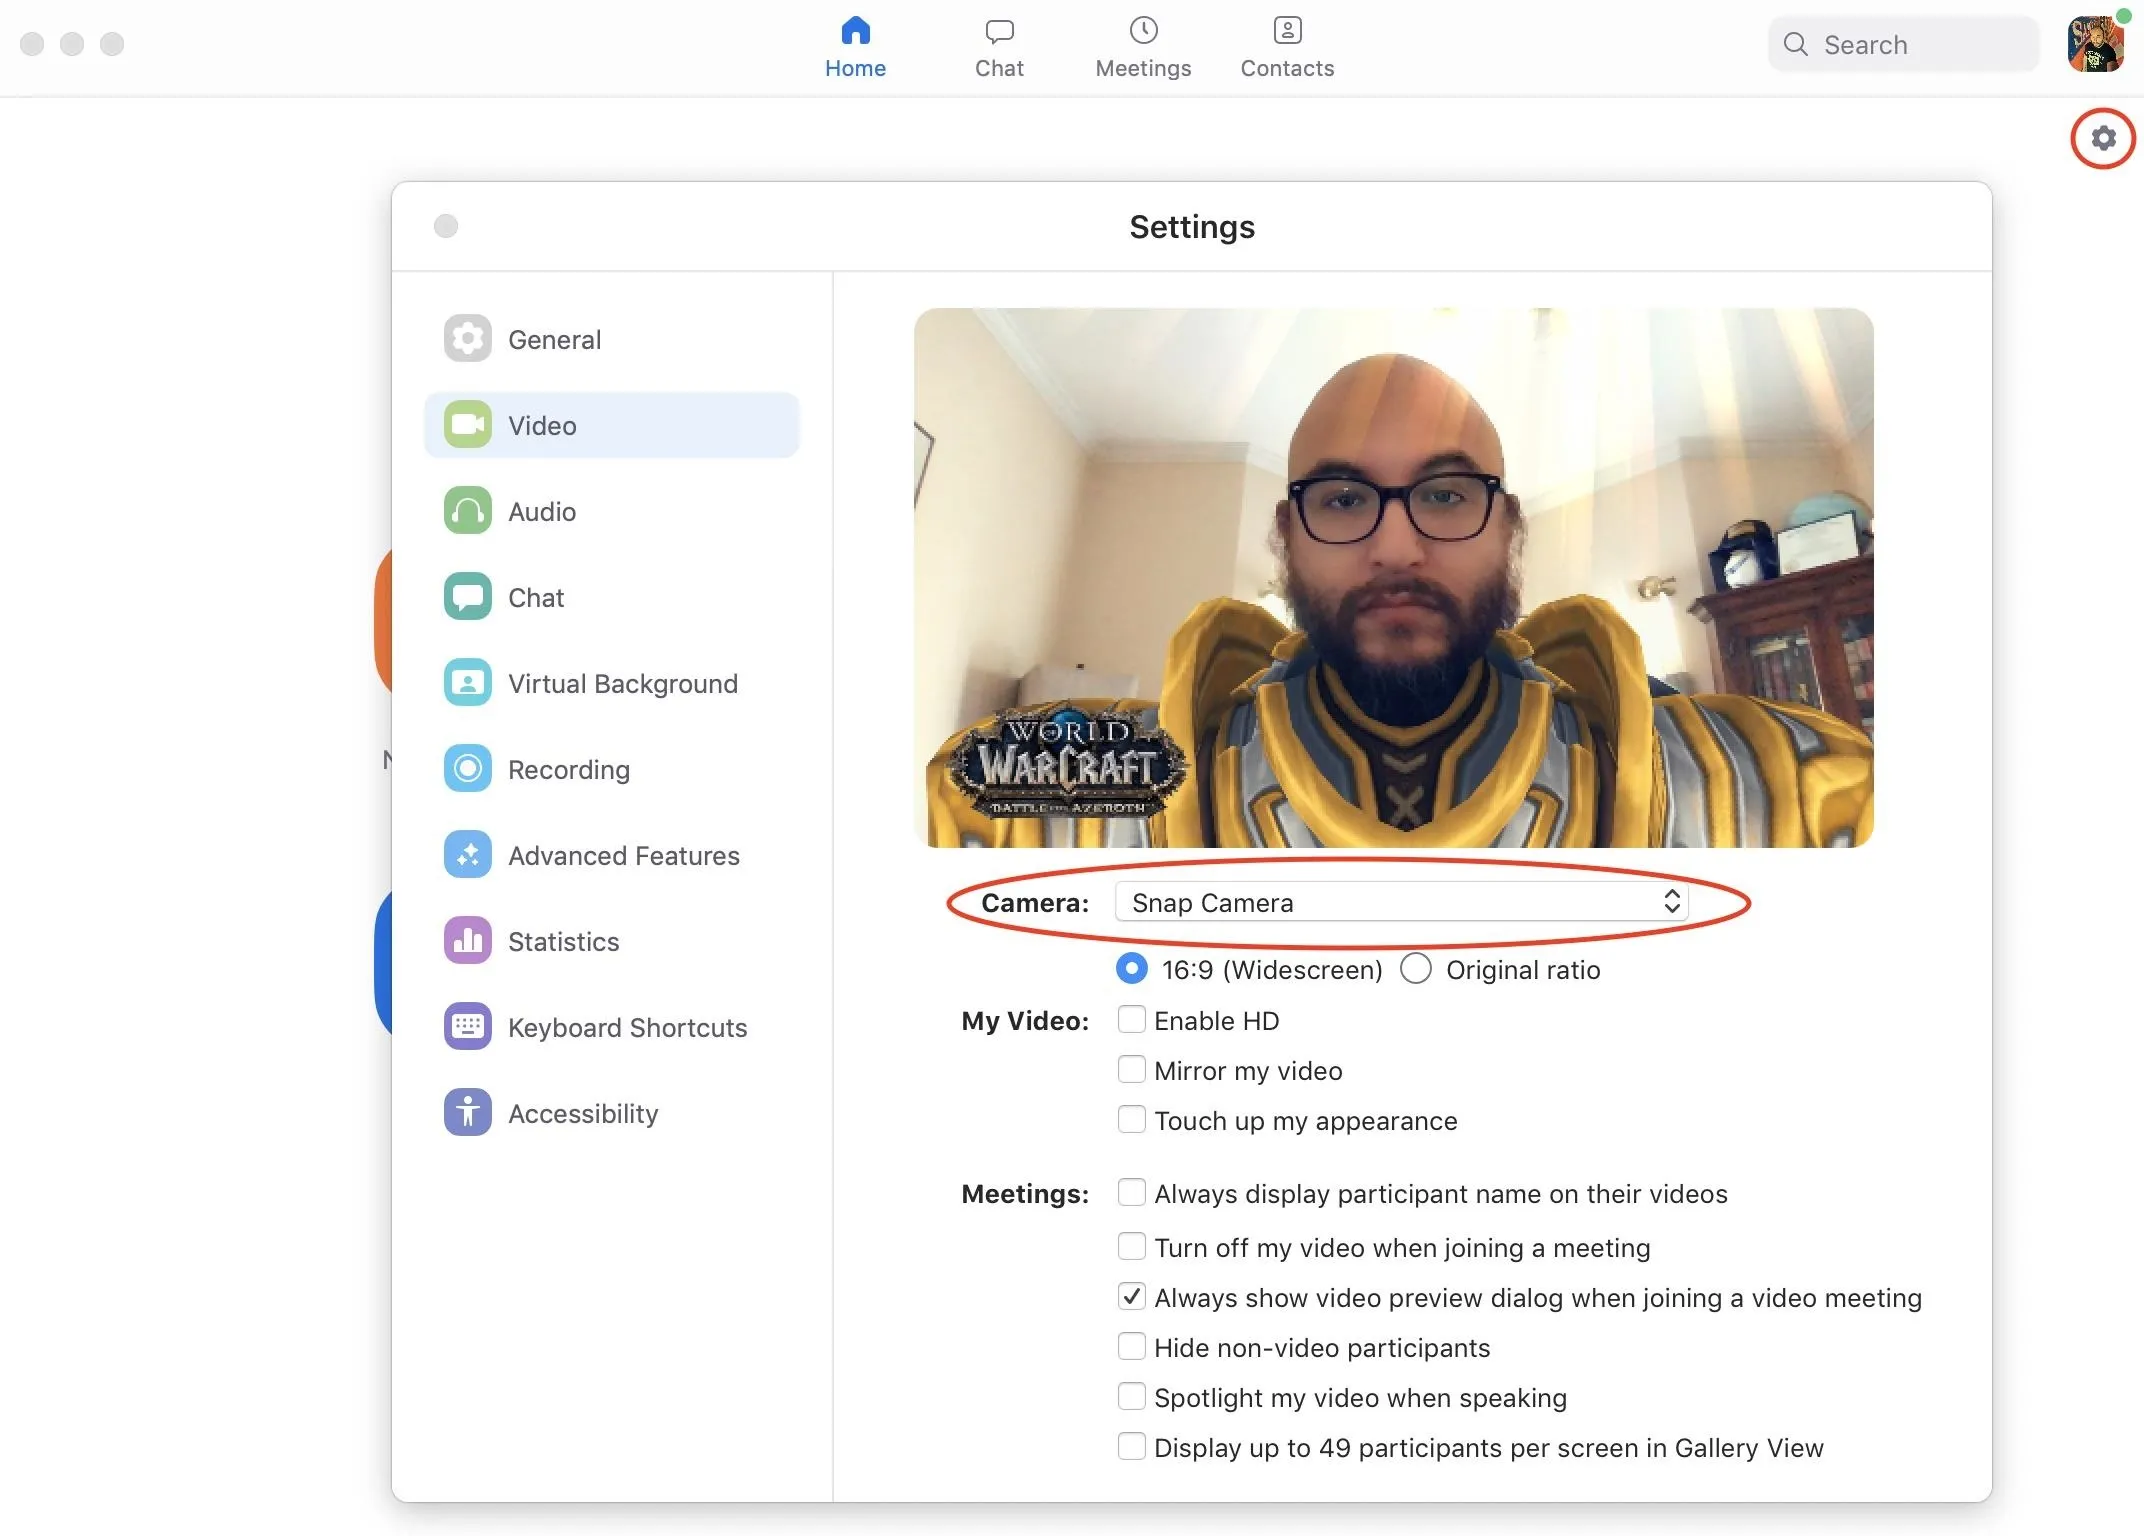
Before starting a call in Zoom, click your profile photo on the home screen and then choose "Settings." (The Mac version also has a gear icon below the profile photo.) In the Settings window, select "Video" from the listed options. Beneath the live video preview, you'll find a drop-down menu where you can select Snap Camera as the active camera.
While in a Zoom, the process is actually much easier. Click on the caret to the right of the Start/Stop Video button, and then select "Snap Camera."

Google Meet
Before starting a meeting with Meet, you can click on the gear icon to access settings. Under the "Video" tab, you can select "Snap Camera" from the drop-down menu. Like Zoom, you can also enable Snap Camera during a call by clicking the vertical ellipsis on the video feed to access the "Settings" window.
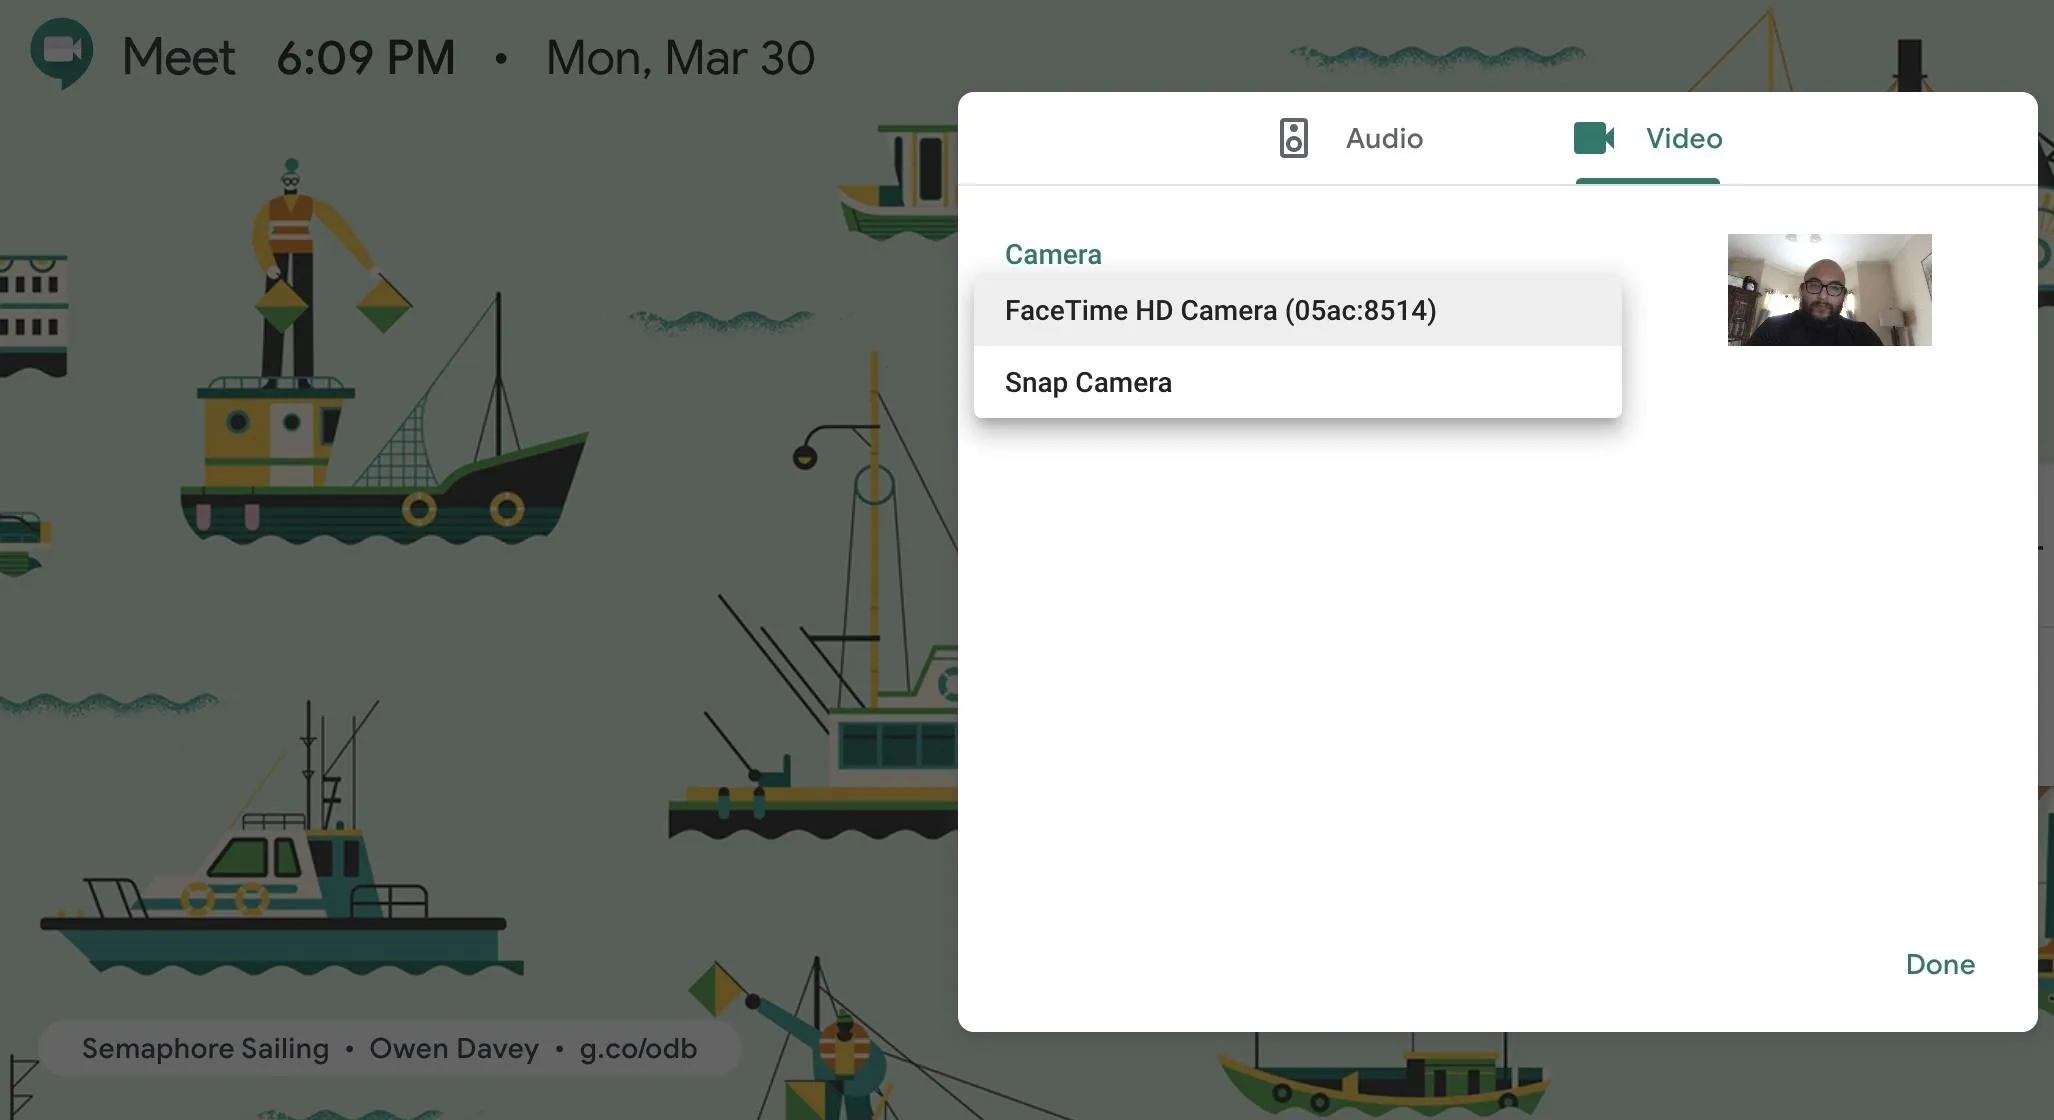
Pre-call settings for Google Meet (top) vs. the in-call settings (bottom).
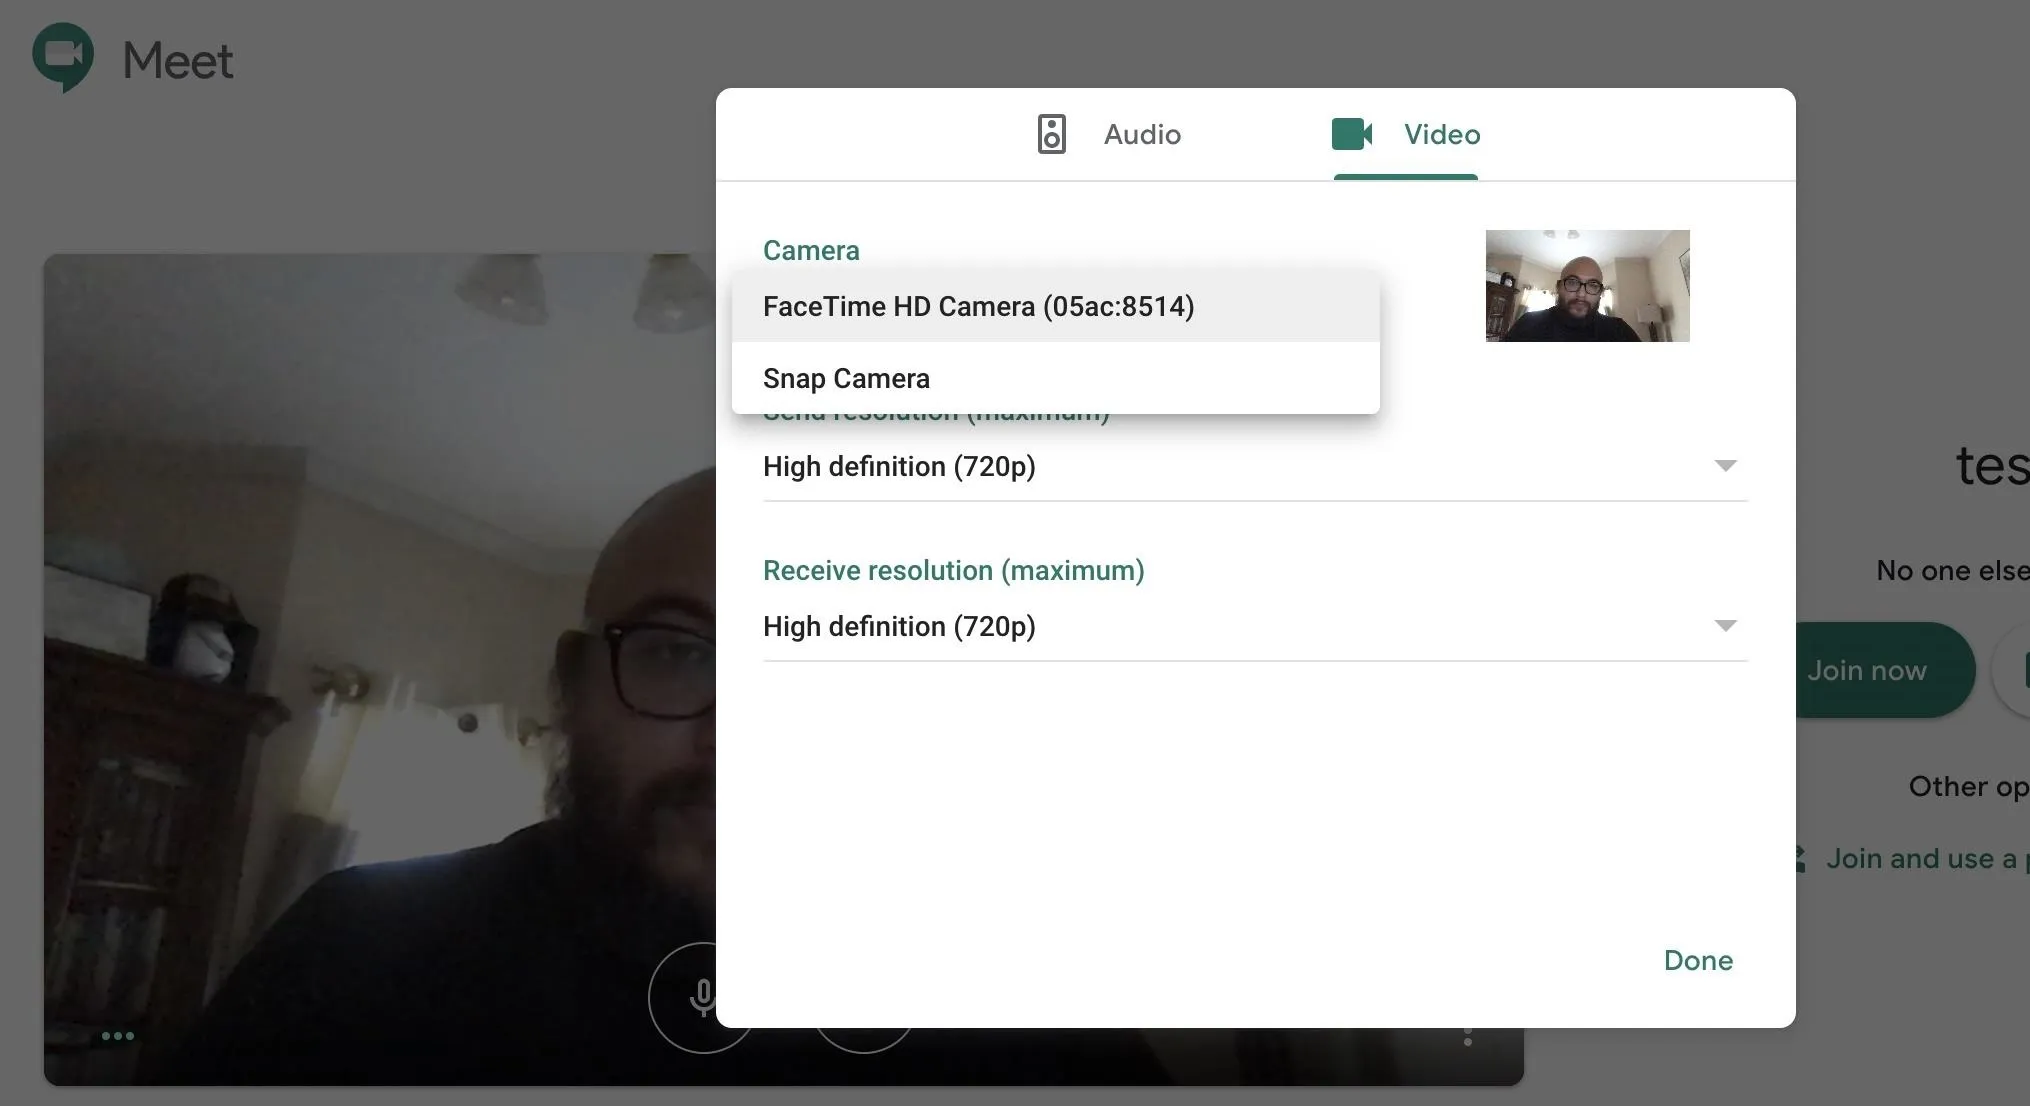

Pre-call settings for Google Meet (top) vs. the in-call settings (bottom).

Google Hangouts
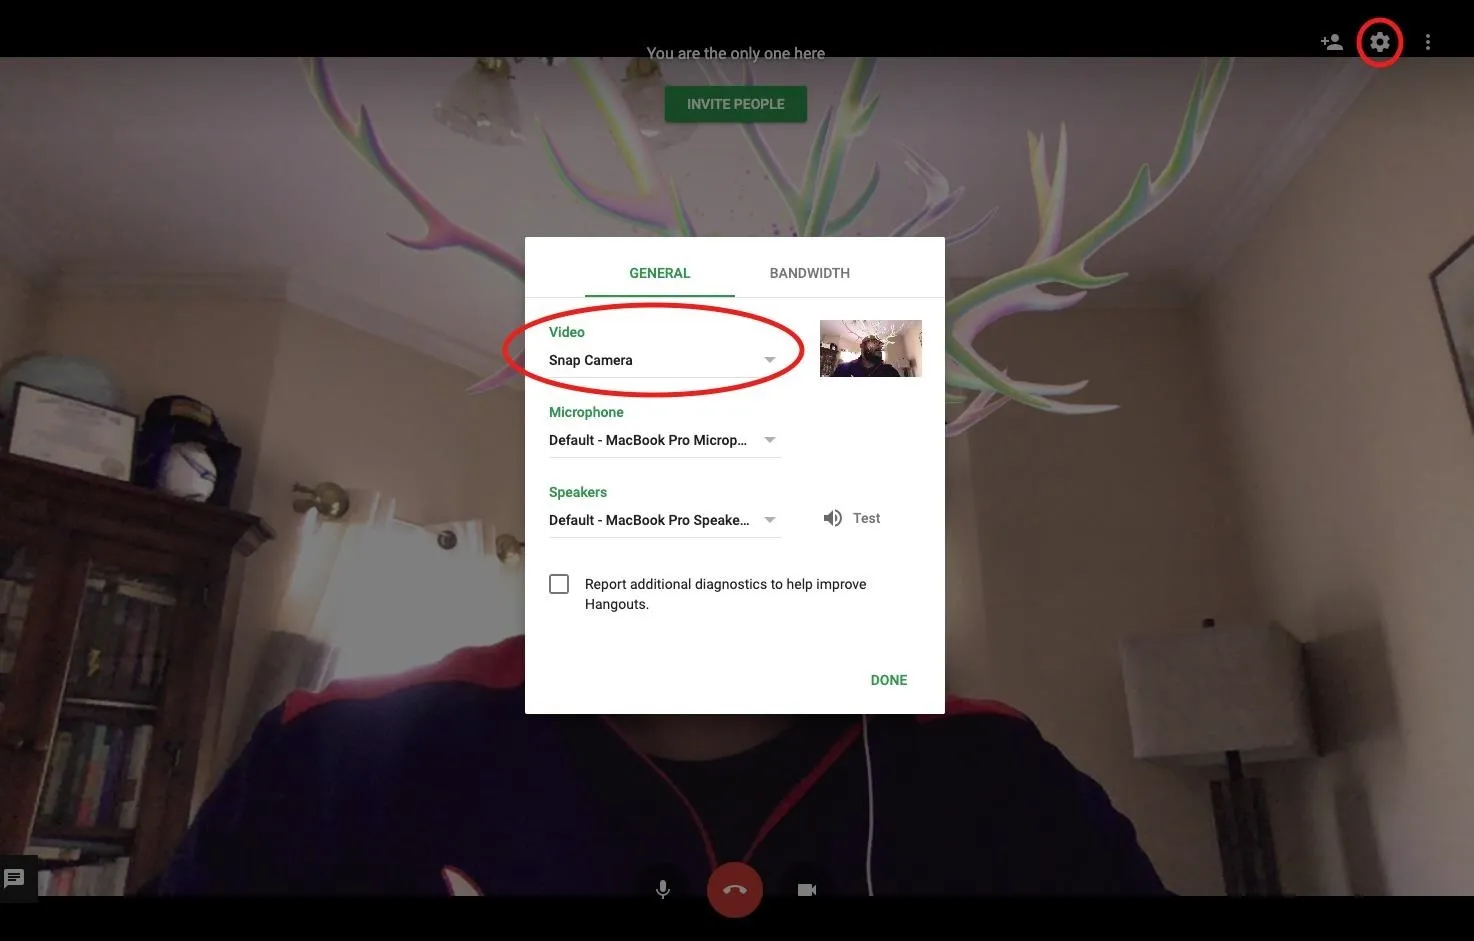
The consumer-facing predecessor of the enterprise-grade Google Meet, Google Hangouts, does not offer an option to select the camera before the call. Instead, it has a similar process for choosing Snap Camera during an on-going video call. Once you're in the video meeting, select the gear icon in the top right. From there, you can choose "Snap Camera" from the drop-down menu for Video under the "General" tab.
Skype
If you are logging into Skype, either via the desktop app or the web version, you'll actually have the opportunity to select Snap Camera from the startup process, which also involves accepting all of the hardware permissions needed to operate the service.
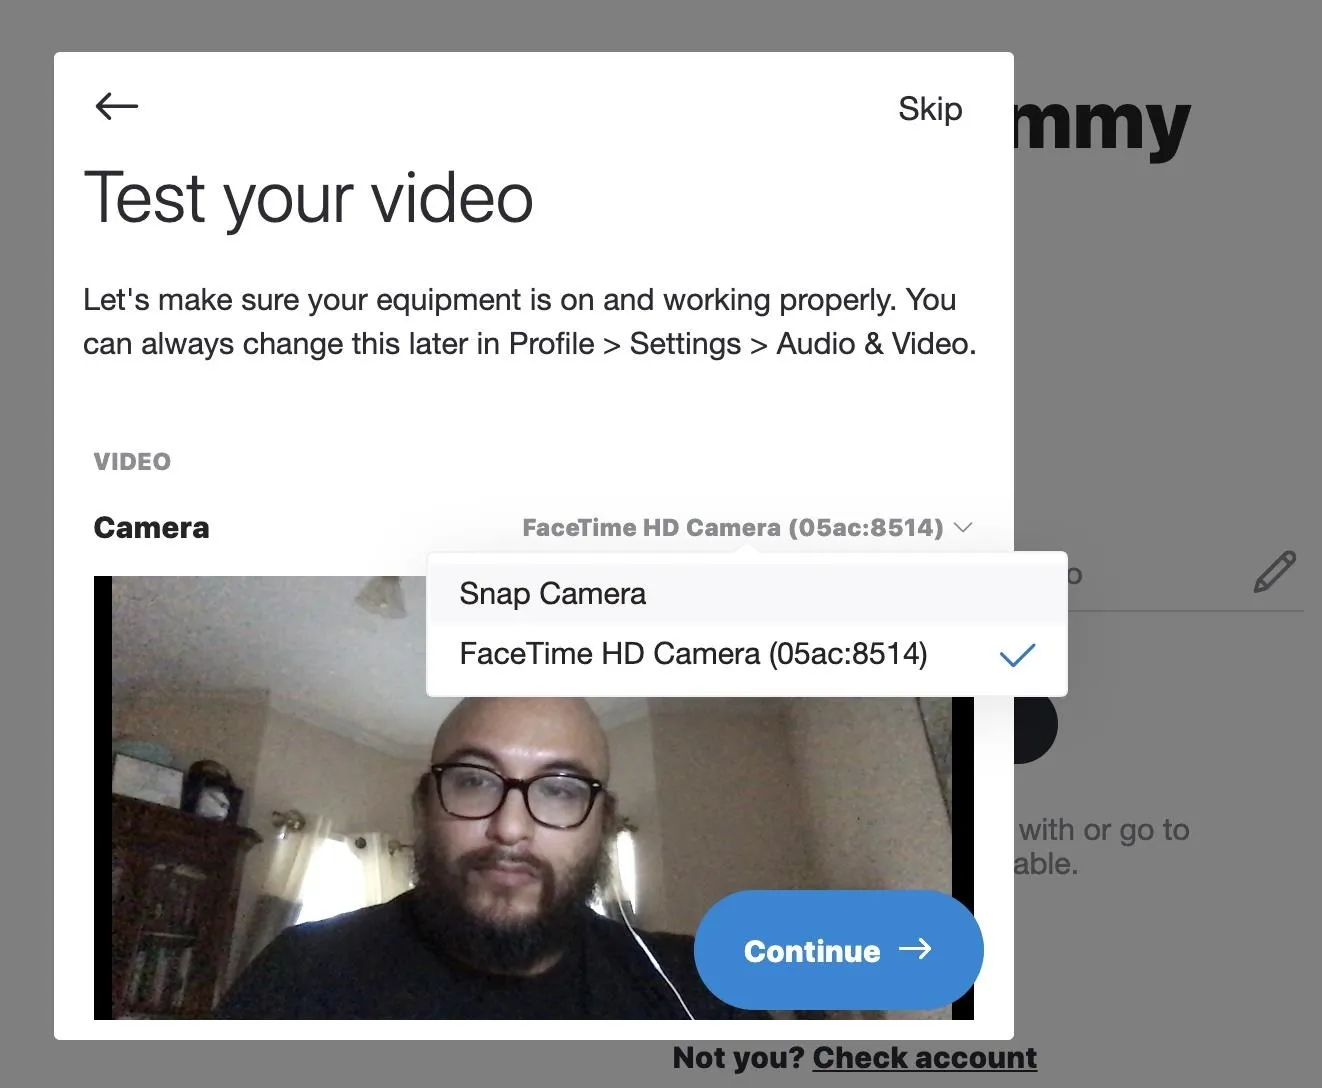
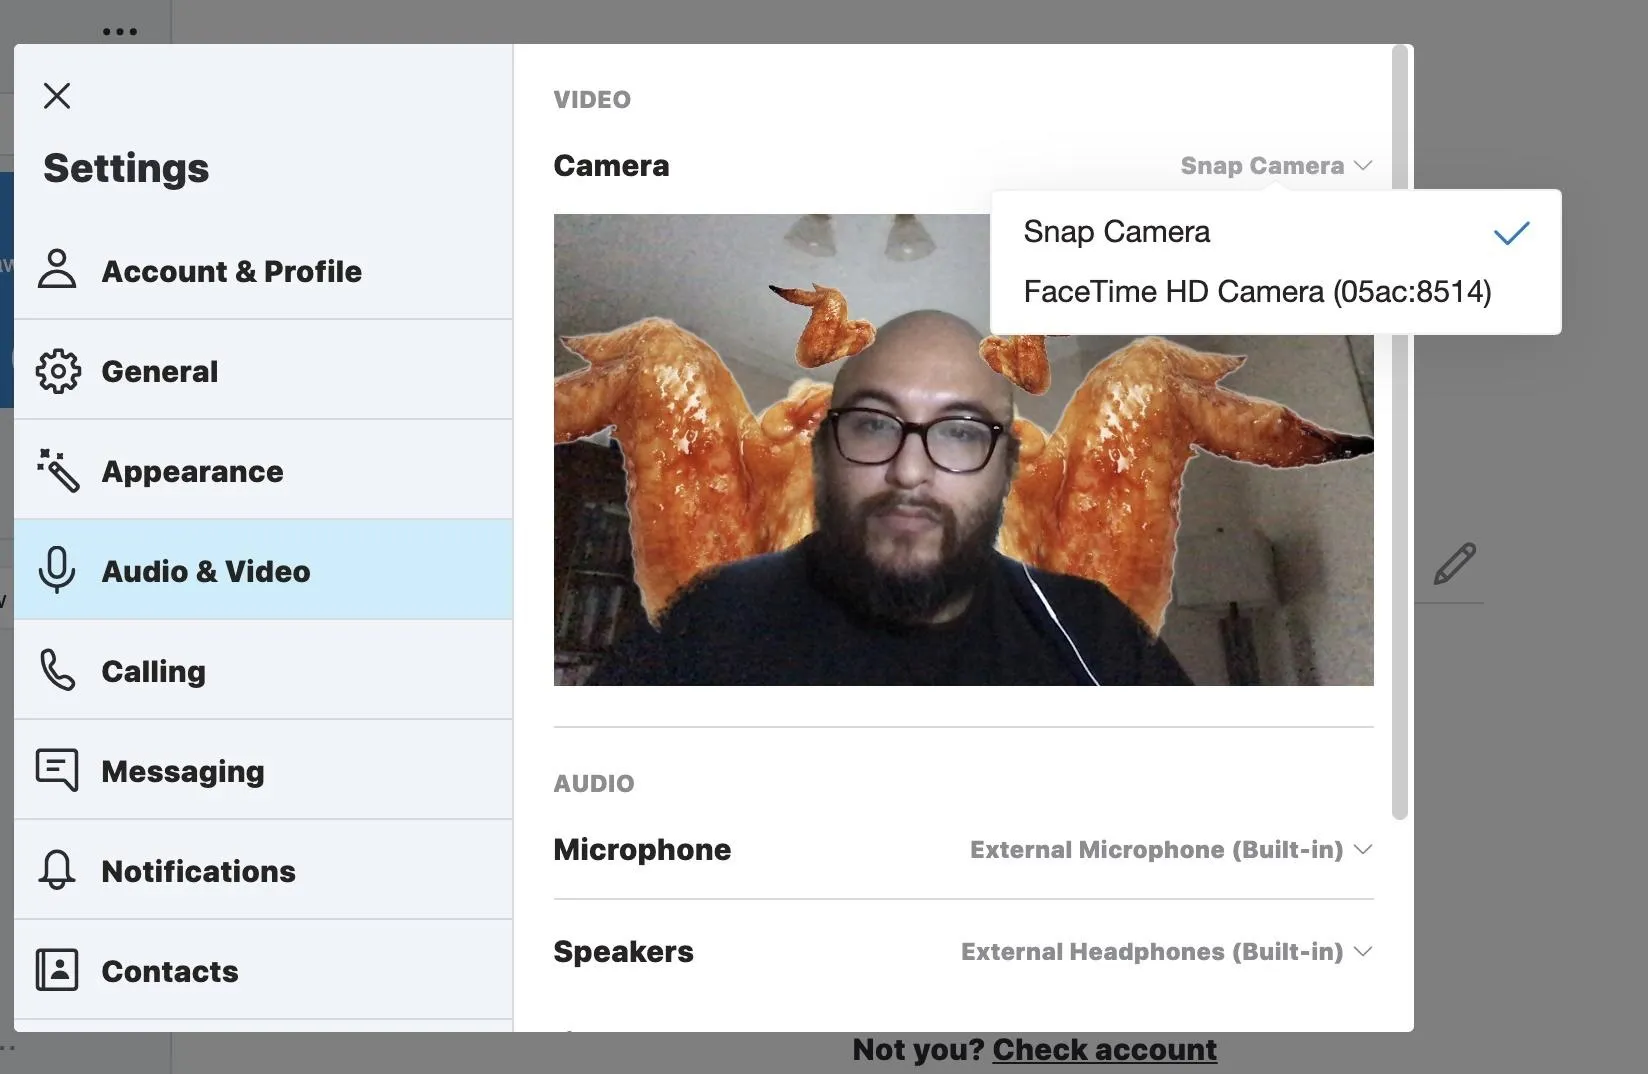
If this isn't your first time, the "Settings" menu is tucked under the three-dot icon in the vertical taskbar to the left. To select "Snap Camera," navigate to the "Audio & Video" section, and the drop-down selector is located above the camera preview.
Slack
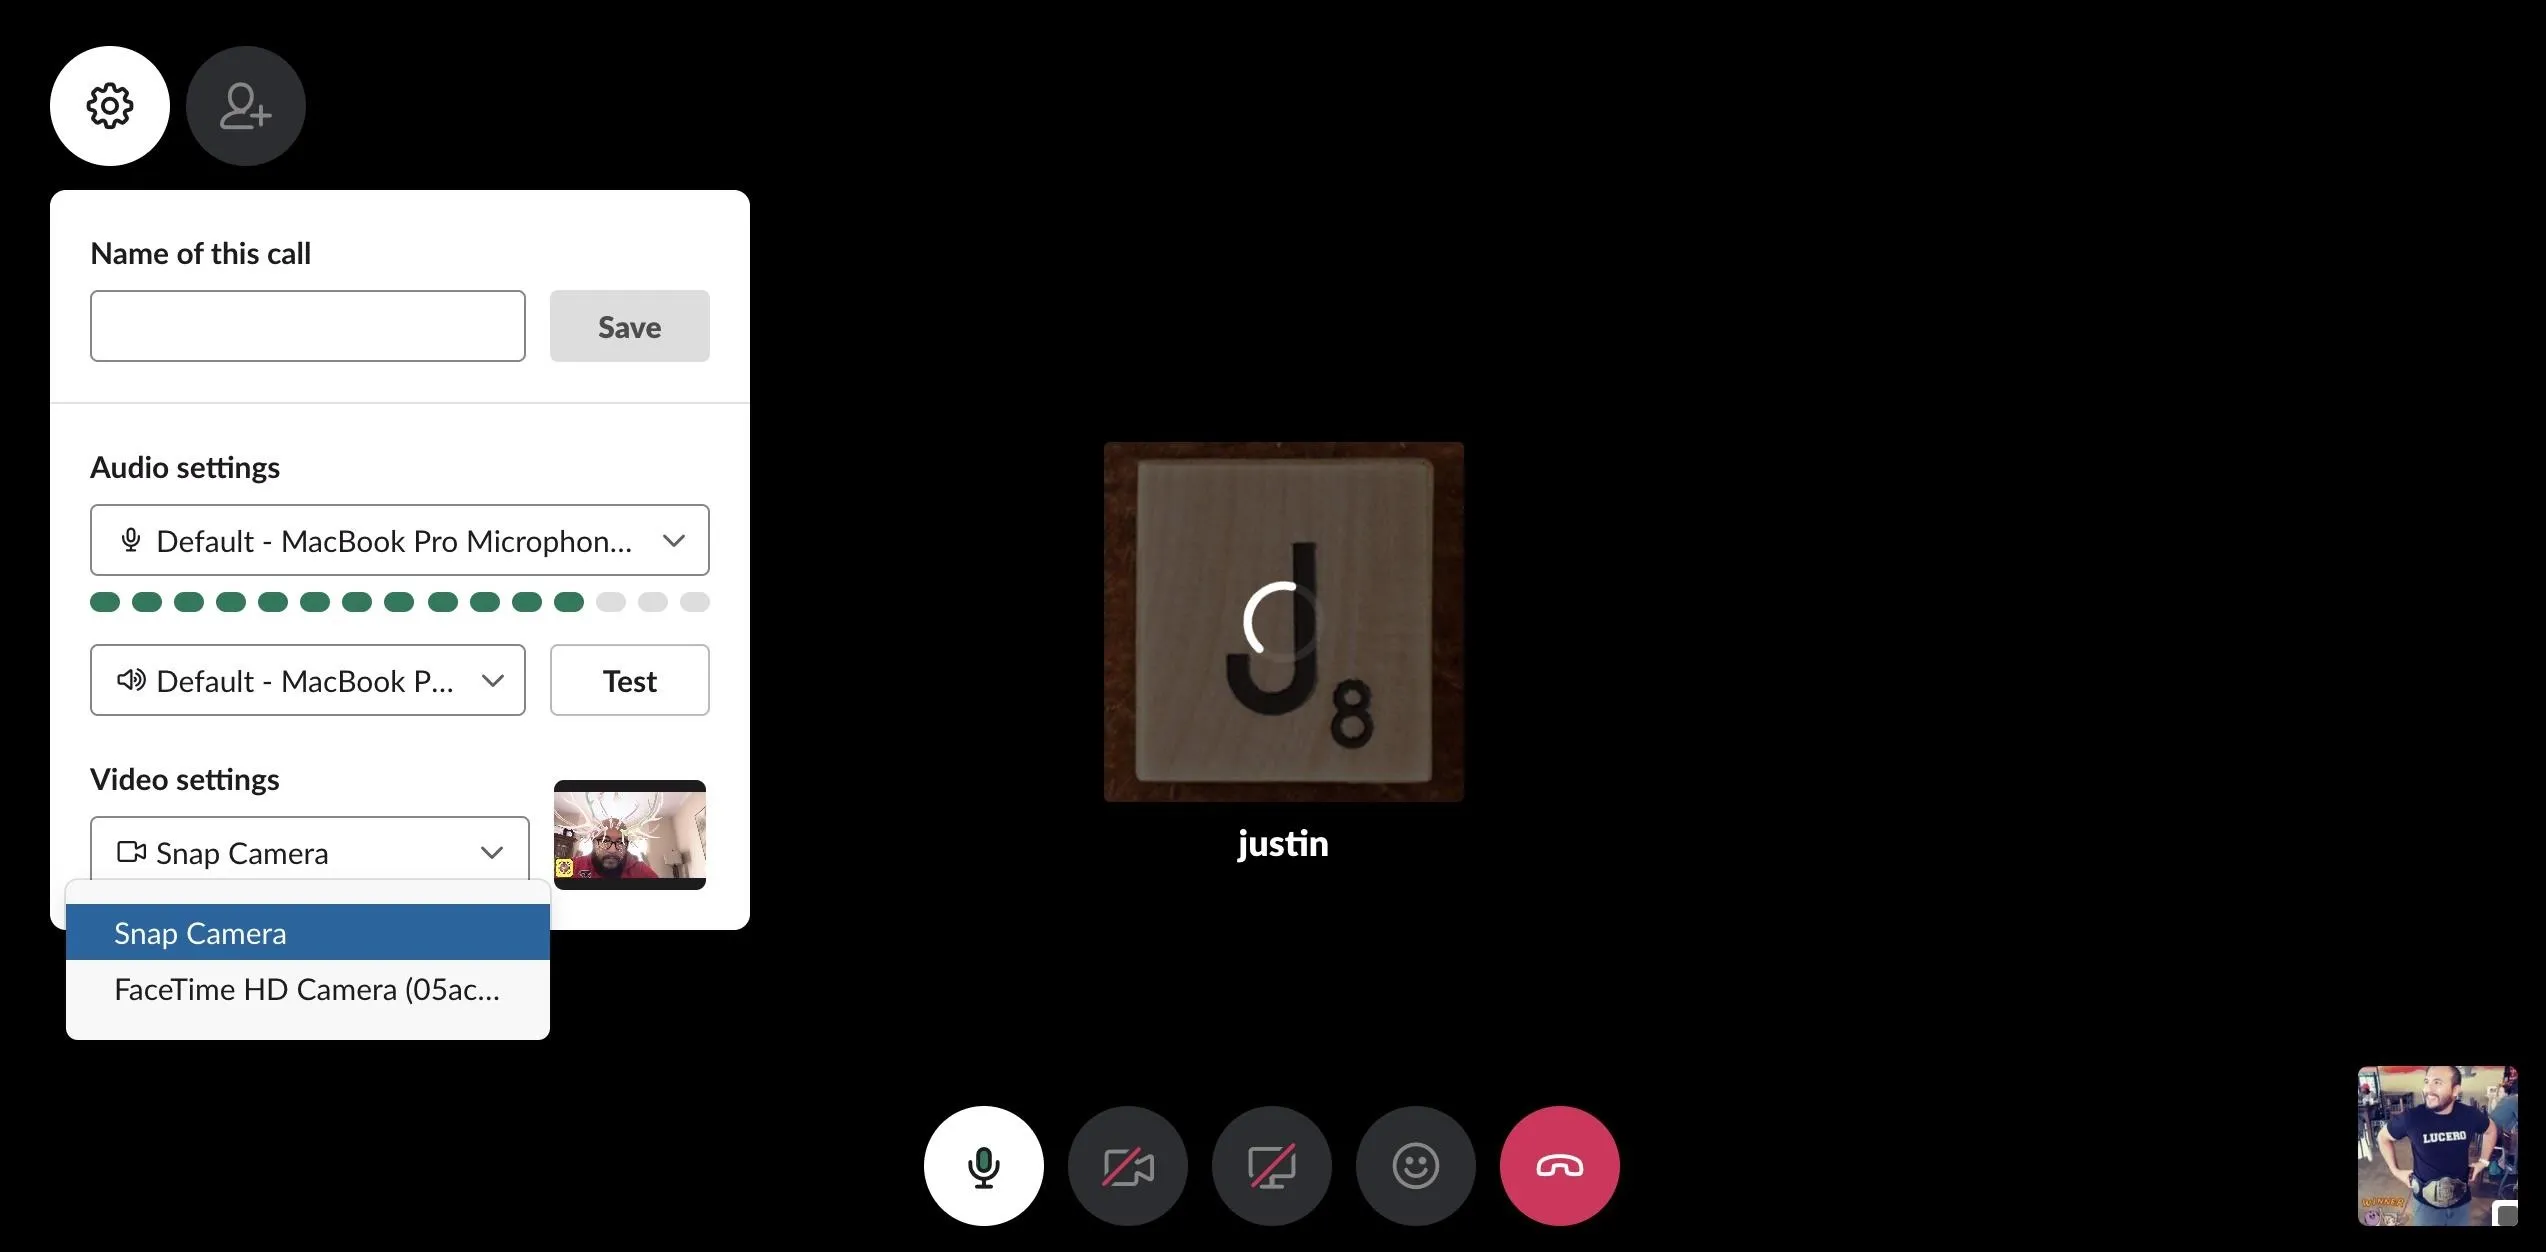
While I wasn't able to select Snap Camera for a video call through the desktop app, I was able to accomplish the feat through the web client. In an active call, look for the gear icon in the top-left corner. Click it to open a menu where you can select "Snap Camera" under the Video settings drop-down.
Microsoft Teams
Slack's top workplace chat competitor, the Teams app from Microsoft, has the option to select Snap Camera as well. My experience with Teams meetings is limited to the web-based version, but, if you find yourself invited to a Teams meeting, look for the "Devices" option in the video feed, where you can select "Snap Camera" as your preferred video camera.

Everything Else
As you can tell from above, the process is almost the same for each app mentioned. So if you're using another video calling app on your computer, the process will be very similar. Just hunt for the video option in the app's settings, and you'll see fairly quickly whether you can do it or not. We tried in the FaceTime app on Mac, which does let you switch cameras, but Snap Camera did not appear, so not every app is supported.
Share Lenses with Others
Finally, with your AR effects live in your video call, others may want to try out your Lens. The easiest way to accomplish that is to enable the "Show Snapcode overlay" option, which is found under "Settings" in the Snap Camera app. It will add a Snapcode that members of the video conference audience can scan via Snapchat's mobile app.
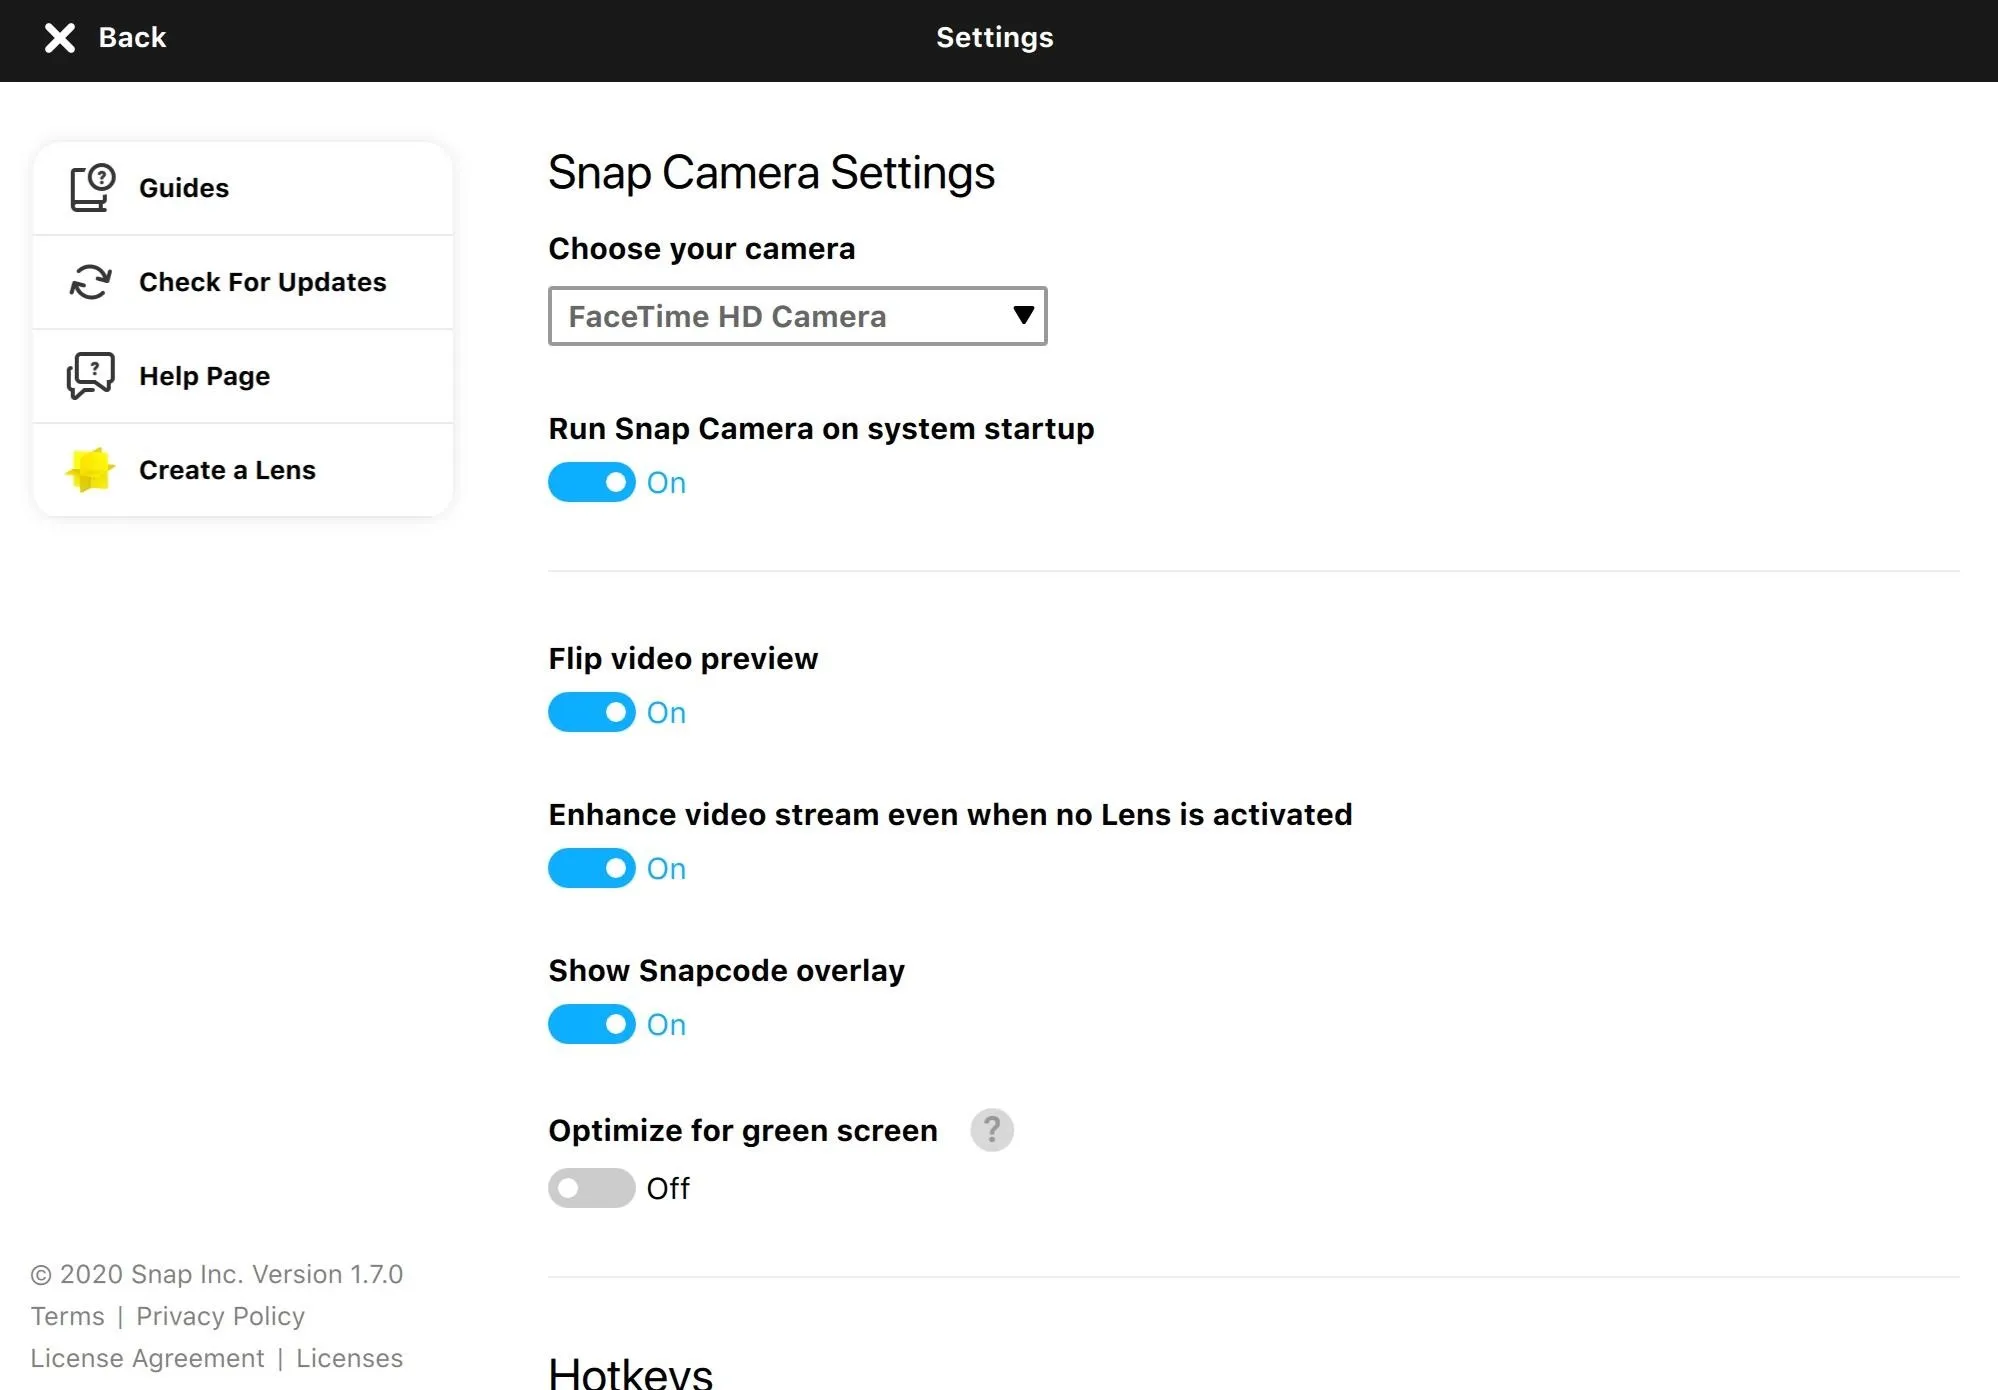
If you'd prefer not to have the Snapcode embedded in your video feed, there are two manual options for sharing Lenses, and both are accessible from Snap Camera itself. Next to the video preview, you'll find the Snapcode for the chosen Lens. Click the image to expand it and find several options specific to the Lens. In addition to clicking the star to add it to your favorites, you can copy a link to the Lens or download the Snapcode to share with others.
These are trying times, so the AR effects can help bring some levity to your video calls. You can use it to break the ice or raise morale for participants on business calls (just be sure to read the room first) and alleviate some of the boredom that self-isolation can cause.
Cover image, screenshots, and GIFs by Tommy Palladino/Gadget Hacks











Comments
Be the first, drop a comment!